

The Check Cord
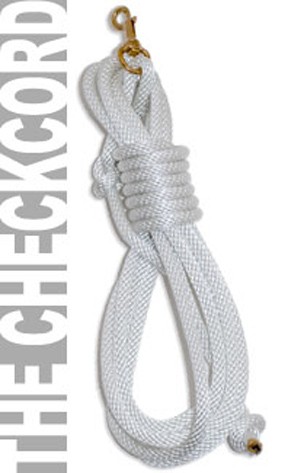
So exactly what makes a piece of rope into a check cord? The most important component is the rope. Ideally, a tightly woven nylon is used, and it will have some stiffness or "body" to it. This makes it easier to handle, since it won't tangle as much as soft rope, and the slight stiffness makes control of the rope work smoothly, especially at a distance. The diameter can be 3/8" or 7/16" depending on what feels good in your hand. Length is a matter of personal preference, but should fall somewhere between twenty and twenty-five feet. Use whatever length you're most comfortable with. The end that attaches to the collar will have a brass swivel snap tied in with a bowline knot. The swivel in the snap keeps the rope from twisting up, and the bowline knot puts a little weight in the rope, slightly away from the dog's collar, making the rope easier to maneuver when changing directions. The tail of the rope should be finished with a simple overhand knot to keep the rope from sliding through your hand.
"The collars with a round ring connecting the two pieces of leather make this action more difficult, changing the way the collar moves against the neck when a tug from the check cord is applied."
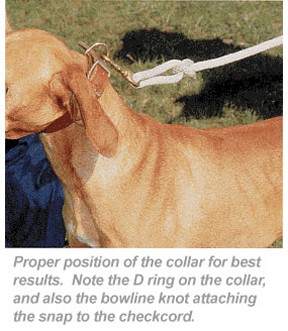
The check cord will snap to your dog's collar, which should be positioned snugly at the top of the neck. The ideal collar for this is plain, heavy leather with a "D" ring to attach the check cord. This will enable the collar to move easily across the dog's neck as you cue for changes of direction with the check cord. The collars with a round ring connecting the two pieces of leather make this action more difficult, changing the way the collar moves against the neck when a tug from the check cord is applied. Now that we've established what a check cord is, let's take a look at what we can do with it. It has the same basic functions as the command lead, meaning it tells the dog to come to us or go with us. The cue on the neck, coming from either the command lead or the check cord should always be a light tug and release motion, rather than a steady pull or hard jerk. Think of it as a "tap, tap, tap" motion, coming from your fingers and wrist.
As we begin teaching the dog to quarter in front of us, the check cord gives us the advantage of gradually giving the dog more space while maintaining control. When introducing the dog to the check cord, follow your normal training routine. For us this means going to the stake out chain, then to the command lead, both leading and quartering; and if all is going well with the lead, then we introduce the check cord. If a dog is not giving us willing compliance on the command lead, we will not move ahead to the check cord. Moving forward in training too quickly causes confusion, and you will bring all the problems from the previous step into the new step.
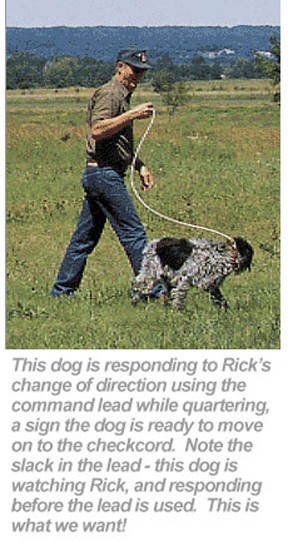
There are three basic drills on the check cord: stand or sit still; come to you; and go with you. We begin with standing or sitting still, depending on the breed. If the correct foundation has been laid on the chain and command lead, the dog should understand how to stand or sit still until asked to move. From the still position, step forward briskly and cue the dog with the check cord via light taps on the collar. This cue means "go with you", and should be accompanied by a quick pace from the handler. Once you're moving, step sideways away from the dog, angling away at a sharp angle. The dog will probably respond by turning to go with you. When this happens, (let's say you were going to the right) change direction by turning left and gently flipping the cord across the dog's back. This in turn will cue the collar, and the dog should make a left turn and continue to go with you. Each time the dog turns and crosses the center of your location, you change direction. Done consistently, this will teach your dog to watch you closely for changes of direction.
An important consideration here is to be sure all turns your dog makes are away from you, never turning back toward you. This will prevent the dog from circling back, something we don't want a well-trained bird dog to do. Circling means the dog is covering territory already hunted, and it wastes valuable time and energy. A good dog will work in a precise quartering pattern in front of you, always changing direction by turning out away from you in a loop to the front. Dogs tend to have one direction they turn to more easily than the other, much like we are right- or left-handed. If your dog turns the wrong way, gently turn him back the correct way and go on. Pay close attention and you will notice which turn is harder for your dog. Once you have that information, you can anticipate it, and can make a correction before your dog completes the mistake. A good handler always anticipates what may happen, and works to prevent errors rather than fix them. Once the dog anticipates your turns, they will pay closer attention, and will start turning before you have a chance to cue them with the check cord. This is a good thing, since the end goal is a dog that will watch us closely and no matter what direction we take, they will turn and go with us, neatly quartering out to the front.
Think of the face of a clock….we want our dog to work out in front of us between ten o'clock and two o'clock. Keep in mind that these exercises are not about teaching the dog to simply run back and forth in front of us-it's about teaching the dog to pay attention and go with us.
During these drills, occasionally stop and move backwards to cue the dog to come to you. Doing this part of the drill teaches the "here" or "come" command. Don't add a verbal command to this until the dog is consistently doing it…if you're having to pull the dog in to you, all the while saying "come", the dog learns that "come" means pull back and argue. If you wait until your dog is complying before you give the action a name, learning will be quicker and easier. Before you try this, know where you will want your retrieves delivered. This way you can consistently teach the dog to come to you and stop at the spot you desire, whether it's at your side or directly in front. Always have the dog come in and stop in the same fashion, so the habit will develop. Once the dog has come in and is in the "bird delivery" spot, have it stand/sit calmly for a few seconds before resuming the quartering drills. The entire drill should only be done for about ten minutes at a time. You can do several ten minute increments a day; just don't do them all at once! This check cord drill needs to be repeated until it's second nature to both you and your dog, with the dog showing consistently willing compliance. It takes as long as it takes.
So far, we've learned that the dog needs to work out in front of us and quarter between ten and two as long as we're moving; and the dog is to come to us if we are backing up, stopped, or kneeling. Once this has become learned behavior for the dog, it's time to add birds to the equation. We like to plant hobbled pigeons, and then work the dog on the check cord, starting downwind from the bird and working crosswind so the dog has the best opportunity to catch scent. When doing this, be careful to not try to show your dog where the bird is by leading him to it. The whole point of this is to teach the dog to use its nose and find birds for you…showing the dog where the bird can be found is equivalent to doing your child's homework for them. The dog will learn by trial and error how to best utilize the scent, so don't deprive them of the chance to learn.
The first few times you check cord your dog on birds, expect the dog to pull and be excited. As we mentioned before, anticipate this so you can correct it before it escalates into a tug-of-war. The check cord should always be used in a consistent manner with a "tap, tap, tap" motion from the fingers and wrist. This may be difficult when the dog is excited about birds, so be prepared to use your arm as a sort of shock absorber. Keep it close to your body so that when the dog pulls, you have some room for give with your arm. If your arm is already fully extended, you have lost the opportunity to give a correction. Keep tapping on the check cord, making sure you give a good solid tap at the exact moment your dog hits the end of his rope. This well timed correction, applied consistently, will give the dog a consequence for its action.
When working with the check cord on birds, it's critical to remember to be light handed. A heavy hand and lots of pulling or yanking will distract the dog from the birds and intimidate it. The last thing we want is a dog always looking over its shoulder, expecting something negative, whenever it points a bird. Heavy handedness does more to take the style out of a dog than anything else.
You may find handling the check cord a bit awkward at first. Don't worry about keeping any of the excess cord coiled up; instead, let it drag straight out behind you. Always keep a bit of slack in the rope so you can cue the neck. Without some slack, you will have a pulling match instead of a training session. Practice flipping the rope the way you will when working your dog. You can do this by snapping the rope to any stationary object, like a fence post or the hitch on your truck. Practice using a light wrist motion to flip the rope back and forth, and learn how much slack you will need in the rope to do this. Once you've learned this, your training will get easier since you will be able to keep the check cord in the proper position and it won't get tangled up in your dog's legs, therefore changing the point of contact.
Repetition and patience combined with a light hand will bring your dog to a level of willing compliance and help him be the very best hunting companion it can be.