


The Command Lead (also known as the Wonder Lead)
Before we go further, we’d like to offer a brief history of the lead. It was developed by Rick’s father, Delmar Smith, and got its original name ( the wonder lead) from another fine trainer, Ed Rader, who made the comment “You’ll wonder how you ever got along without it”. In The Silent Command System, it’s called the command lead. No matter what you call it, it’s an invaluable training tool.
The command lead carries on the training that we started on the stakeout chain. The chain began developing a point of contact: the neck. The training on the chain also gives a dog the confidence to be content with being restrained, and to stand or sit quietly while restricted by the point of contact on the neck. As we move from the chain to the lead, we will expect this learned behavior to transfer from one to the other. Additionally, the lead and the restriction of it teaches our dogs to tune in to us and go along with us at any speed in any direction. The dog learns to pay attention and take direction from the person holding the lead, which eventually transfers to the dog going with us off lead via watching the body language it learned while on the lead. In other words, the dog continues to surrender to our leadership and acknowledges us as pack leader. The whole process, from chain gang through the lead, check cord, whoa post, and eventually e-collar, is all about teaching the dog to turn off stimulation.
"The whole process, from chain gang through the lead, check cord, whoa post, and eventually e-collar, is all about teaching the dog to turn off stimulation."
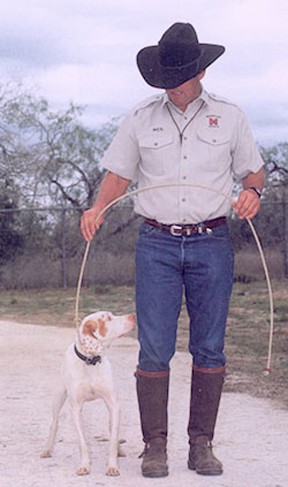
Starting to use the lead is simple. First, it needs to be put on correctly. Open the loop so it will slip cleanly over your dog’s head. The knot needs to be on the side closest to you-if your dog is going to be walking on your left side, the knot will be on the right side of the dog’s neck (see photo). This is important because the lead works on a release for reward basis, and cannot release correctly if put on wrong. Work your dog on leading on your off-gun side, as that’s where you’ll want our dog to lead when carrying a shotgun.
There are two stoppers on the lead. One is made of rubber and is meant as an emergency measure to keep the loop from slipping off the dog’s head. The rubber stopper should never be adjusted snugly. The other stopper is made from leather and is positioned at the tail end of the lead. This will be your eventual goal as a holding point, and prevents the rope from slipping through your fingers.
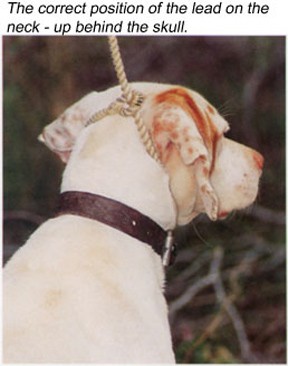
With your dog standing (or sitting, depending on the breed) quietly on the chain, slip the lead on correctly. Do not force the lead on, or put it on if your dog chooses to move. Adjust the lead so it is up high, directly behind the dog’s skull. Do not use the stopper to tightly hold it in place, as this will make it too snug and not release correctly. If the stopper is used, it should be a few inches below the knot. There is a groove just behind the dog’s ears that this lead fits into nicely, and it will have the desired effect positioned in this spot.
It’s time to begin leading your dog. The number one thing to remember at this critical time is use a light hand! There is no reason to jerk the dog off its feet or otherwise lose your cool, so be in the right frame of mind when you begin working with the command lead. The action of the lead should always be straight up. Don’t pull back toward your body, as this will pull the lead down into the wrong spot on the dog’s neck. Think about keeping your elbow in line with your side, and using just your upper arm to work the lead. Keep your fingers loosely around the lead, with your thumb and forefinger encircling the rope. It looks kind of like you’re holding a teacup with your thumb and forefinger while your pinkie, ring finger and middle finger are all held slightly away.
At this stage of training, your hand will be much closer to your dog’s head than it will be in later stages. This close proximity allows for quick corrections, necessary so your dog learns exactly what is expected of it. The length of lead between your hand and the dog will vary according to the height of the dog, but will be roughly eighteen inches. The rest of the lead can be held in the opposite hand to keep it out of the way and to allow for adjustments in length.
To give a correction, simply squeeze your last three fingers into your palm and then release. The release is the most important part of the correction, as it tells your dog what is needed to turn off the stimulation. Too often we see dogs being led “strung up” on a tight lead. This isn’t training; it’s holding the dog in place. Our goal is to have the dog walk alongside us on a loose lead.
The stiffness of the command lead is its major benefit. This stiff rope allows for a spring-like action as soon as your hand lets go, and because of the round rope release/cessation of stimulation is immediate. When reward is quick, the dog learns more easily what is expected. We cannot overemphasize the importance of a soft touch and light hands.
What’s the correct position for your dog? We like to have our dog’s eyes even with our leg. This enables the dog to be able to visually read our body language without having to turn its head, and also gives the best control. If the dog gets ahead of this position, give a short, quick correction. Being able to really focus on and read your dog will help, since you’ll be able to correct the dog before it gets out in front of you. This requires a good deal of absolute concentration on the part of the handler, so be prepared before you start each session. Keep the training sessions short (ten minutes or less) and do several of them each day, always going from the chain to the lead.
It’s also important to keep your dog’s head up. A dog with its nose to the ground is not reading the handler and is thinking about doing something on its own. In all corrections, a short tug and rapid release will get results.
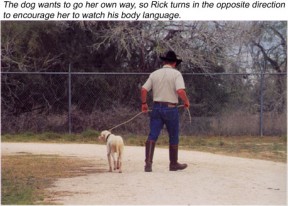
The objective of this drill is to make your dog read your body language. When you go slow or fast, turn right or left, or stop, your dog should do the same and remain in the proper position. A by-product of this is that it teaches your dog to heel and to whoa or stop, but the main purpose is to teach the dog to go with us in compliance on a loose lead by reading our body language. Pointing breeds should remain standing when at heel, while flushing and retriever breeds should be sitting.
Most dogs react the first time or two by pulling and trying to drag you with them. The cure for this is to not let the dog get out in front. Watch carefully and correct as soon as they start to move from your side. If you wait until they’ve committed and made their move, they’ve outsmarted you. Tune in to your dog and give it 100 % of your focus and you can prevent mistakes before they happen. Do not hold your dog in place with the lead; instead, correct and release as many times as you need to until the dog complies. If the dog wants to go fast, you deliberately go slowly. Make the dog adjust to you.
Once a dog has tried pulling and figures out that won’t work, they will usually stop and refuse to move. The fix is simple. Get out to the end of the lead, with the leather stopper held against your palm and the lead going between your middle and ring fingers. Slightly cup your hand and then flex your fingers toward your palm, which will give a tug on the lead. Use short, gentle tug-and-releases with a light hand until the dog gives in and comes toward you.
They will often go back to pulling again, and will switch back and forth between resistances. Just keep gently using the lead with no emotion and a light touch until the dog complies.
Sometimes when a dog stops or is otherwise resisting, they will start gagging. This signifies defiance and is an act. Don’t give in to it. If you’re using light hands and two fingers to pull and release, there’s no way you can choke a dog. Another sign of defiance is grabbing the lead in their mouth. This usually happens when the handler has been keeping tension on the lead rather than tug-and-release motion. Go back to tug and release, and they’ll quit biting the rope.
Sometimes a dog will want to jump up on you, either from the side or wrapped around the back of your legs. Quietly turn and walk right through/over the dog as if it weren’t there. Keep this up until the dog gives up. About this time, many dogs will tuck their tails and act sulky, grudgingly going along with you. This is still an act, because the dog has realized it is not in charge and is not sure it wants to submit. Ignore this behavior and go on with what you were doing.
The final touches will usually have to do with a dog that wants to crowd you or lean on you. Ideally, the dog should work about twelve inches away from you. If your dog wants to crowd, bump it in the shoulder with your leg. If your dog is on your left, turn left as you’re bumping its shoulder. This adds incentive for the dog to move away and maintain the proper distance.
You’ll notice we’ve not mentioned any verbal commands. They’re not necessary at this point, as your body language means more to your dog than does English. We’ll name the commands once the dog is consistently performing the correct action and understands what we want.
This drill will usually take a couple of weeks of steady work a few times each day to conquer, with our goal being a willing dog going with us in compliance. Dogs can be started on the command lead at five or six months, assuming they are submitting willingly and contentedly on the chain. Especially with puppies, a soft, gentle hand and no emotion are critical to success, as are short sessions.
Next time, we’ll bridge the gap between the lead and the check cord, including drills and turns on the check cord. In the meantime, enjoy your dogs and your training!
A few years back, I was invited by one of my horse training clients to observe a dog-training seminar being held near my home in northern Wisconsin. As a horse trainer and dog owner/hunter, I can never resist the temptation to learn something new about training techniques, so off I went to see this Rick Smith fellow. The first thing I saw was a bunch of folks leading their dogs around with—of all things---what looked suspiciously like a piggin’ string (a short piece of rope used in calf roping competitions). My first thought was “this guy is nuts, selling people a piece of rope to lead their dogs with”, but then the trainer in me kicked in followed by curiosity. I bought one, figuring the worst it could do is compound the pile of training stuff I already owned.
After the seminar, I headed straight for my kennel with this “Command Lead”. At the time I had a particularly opinionated young Chesapeake pup that could pull like a freight train when the mood struck her. I normally used a prong collar on her and had pretty low expectations for this chunk of rope being able to exert any control. Was I in for a surprise!
Within a matter of a couple of minutes, she was walking beside me politely and giving me her full and undivided attention---on a slack lead that I held with two fingers, as Rick had demonstrated. Further experimentation taught me that while the command lead may look a lot like a piggin string, there are some major differences. Yes, they’re both made of rope and they’re both short. The similarity stops there. The wonder lead is made of a specific diameter rope so as to fit in the correct spot on the dog’s neck, and the balance and stiffness is just right to give the proper effect. I now consider the command lead to be the most useful piece of dog training equipment I own.
-Sharon Potter