


The Whoa Post Redux - Part 2
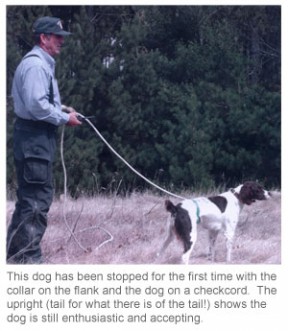
You’ll want your dog quartering on a checkcord for the time being. The e-collar will be placed around the dog’s flank or waist, with the contact points on the belly. If you dog is male, be sure the collar is placed ahead of his sheath. Adjust the collar so the points are snug against the skin, much like having it on the neck. Once the dog has moved a bit, check the collar and snug it up as needed, as it will often loosen up, much like the girth on a saddle will when a horse lets its air out.
Our goal at this point is to loosen the dog up so it feels comfortable with the collar on the flank. Most dogs will not want to move at first because a snugged-up collar around their waist reminds them of the whoa-post rope. As with the whoa-post, they need to move until stimulated to stop, rather than just stopping when something’s around their flank, so we encourage the dog to move via the checkcord. Taking the dog to tall cover where it expects to see birds will make it want to move more freely. Having the dog move easily with the flank collar just the same as it would without is an important step, and not getting through this part before moving ahead to stimulation will set your training back and confuse your dog.
To stimulate the dog into stopping, you’ll need to start with the lowest setting available on your transmitter and move up until you find the level your dog responds to. And be sure to use continuous stimulation – press and hold the button – until the dog is completely stopped. If you’ve done your homework on the post, the dog will stop. If, however, the dog overreacts and reaches around to bite at its flank, the resistance wasn’t worked completely through on the post. When your dog is stopped, allow it to stand still for a minute, then go to it and give your release cue before going back to quartering. Don’t stop the dog again until it is completely loosened up and moving freely. Don’t be tempted to stop the dog over and over again; stopping a dog about twice during a 15-minute workout is plenty. Always quit when you are having success, and don’t overdo until the dog has failed. Remember: During all this the dog has to remain perfectly still while on whoa. No happy feet or creeping ahead allowed.
Continue with these daily workouts until you are completely confident with the dog’s work. At that time, we can begin introducing the verbal “whoa” cue. Say the word at the same time you press the button to stop the dog.
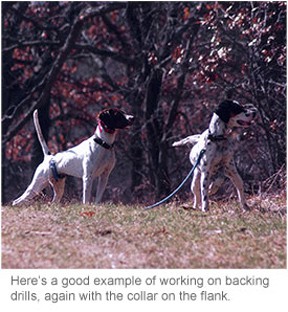
The next step is to set up backing situations. This is the start of teaching a dog to be steady to wing. Using another dog or a cutout, and always with a bird in a launcher, you’ll checkcord your dog, then use the e-collar to stop it as soon as it has seen the other dog (or cutout) on point. The farther away from the situation your dog can back, the more easily the training will go when the bird flushes.
When your dog is stopped, you will drop the checkcord, walk past it to the pointing dog, and then flush the bird. Always keep your eye on your dog so you can stop it if necessary. Should your dog start to move, launch the bird quickly, and then wait for your dog to give chase – don’t try to stop it from creeping at this point, since that can create more pressure induced behavior problems, like blinking. Besides, creeping can be cleaned up later; right now, we want to take the chase away from the dog.
How do we define chase? When the bird is in the air and the dog has committed to chasing it. Here’s where the rule, “ The level of distraction dictates the level of stimulation” comes into play: Anticipate the dog’s excitement and be ready to move up in levels as needed. When your dog is backing on sight consistently and staying steady to the flush without your needing to use the collar to assist, we can start with teaching steady to shot using the same scenario.
The next step is to have your dog do the pointing. Again, you’ll want a bird in a remote releaser or launcher so you can get it in the air fast if necessary. Use a checkcord to quarter your dog into the bird scent. As soon as your dog acknowledges sent, drop the checkcord. The dog will either point or go in to flush. If the dog points, flush the bird, and if the dog breaks on the flush, stop the chase just like in the backing situation.
What if your dog scents the bird and decides to run in and flush rather than point? Launch the bird fast, before the dog gets to it, and then stop the chase. Again, don’t stop the creeping; instead, launch the bird and then stop the chase so you don’t create pressure-induced problems.
When you can quarter in and the dog is pointing and staying steady through the flush and watching the bird fly off, you can add a shot. If you want your dog trained to be steady to shot, keep the dog standing steady. If you prefer the dog to break on shot, allow it.
When taking the chase away, how you stop the dog depends on the level of prey-chase drive in the dog. If the dog has low prey drive, let it come to a “rolling stop” by not upping the levels of stimulation too quickly, letting the dog come to a complete stop in about 30 feet instead of three. This will keep the dog receptive to training and enthusiastic. Trying to stop a low-drive dog too fast can also create pressure-induced behavior.
When the dog is pointing and holding steady to wing and shot as you desire, it’s time to plant birds in launchers in a bigger area and turn the dog loose to run like a regular hunting situation. The bird work will be the same as the drills above. Periodically flush a bird before your dog has a chance to point it, since this will often happen when hunting. This teaches the dog to stop to the flush.
At the point in training where your dog can be turned loose and run on birds and is steady to wing and shot, you can start taking the creeping away, if your dog is doing it. Again, don’t start on this part of the training until your dog has had the chase taken away first, or you’ll end up with a dog that blinks birds. You’ll use the flank collar just as you have been, only you’ll stop the dog as it starts to creep.
We now have a dog that, assuming all the homework has been thoroughly done, is steady to wing and shot, not creeping and is backing another dog’s point. When all the above is finished on pigeons in launchers, we can move to released pen-raised birds. This will add a little more excitement and intensity to the training sessions since gamebirds are more interesting to your dog. Practice until your dog is as proficient on released gamebirds as it is on pigeons in launchers.
We’re almost done. It’s now time to start shooting birds for your dog during training, but don’t kill every bird the dog points. Stick to shooting about one bird out of every three. As you kill birds for the dog, it gets exciting and he will want to break or release prematurely. If you mix it up so the dog doesn’t think that every bird will be shot, you’ll help your dog understand that it must remain steady. Also, when you flush the bird, always watch your dog instead of the bird. Remember: This is still training, and we need to keep our eye on what our dog is doing so we can make the appropriate corrections. The training of the dog comes first.
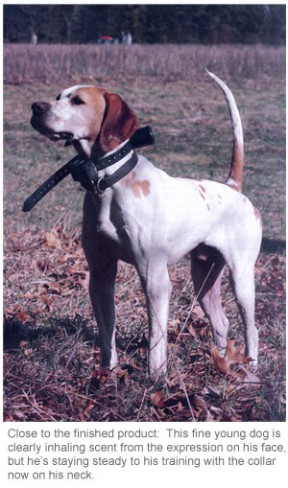
We’re well on the way to a finished dog. When these sessions are going well each and every time, we’ve established learned behavior, and the dog understands its job thoroughly. Now it’s a simple matter to move the e-collar from the flank to the neck, since the dog understands that continuous stimulation means “stop” and the flank is no longer needed as a point of contact.
This may seem like a complicated process, but in reality all we’ve done is break it into easy-to-learn components for the dog, and the more we break it down, the better our dogs understand and learn it. The thing to remember is to take your time and polish each step before moving on; this isn’t something that can be done in a weekend. The more repetitions you do, the stronger the positive habit you’re creating becomes.
Plus, with autumn and hunting season right around the corner, just imagine how much fun it will be to hunt over that classy, finished bird dog. The better trained your dog is, the more shots you’ll get, and that makes for a great partnership in the field.