


The Whoa Post Redux - Part 1
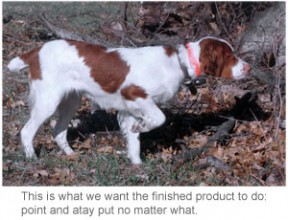
First, we need to talk about “whoa.” At this point, it has nothing to do with birds and everything to do with yard work and basic obedience. It’s simply a method of obtaining a conditioned response to a particular stimulus, in this case the dog’s flank, and that stimulus means, “Stop immediately and stand perfectly still until ordered to do otherwise.” While that’s fairly easy to do when the dog is next to you, being able to do it at a distance later on is the reason we use the whoa-post and cue on the flank. The post is useful because it is a controlled environment. We can keep the dog from moving back, forward, or laterally, which means complete immobility.
You’ll need a few things to begin: your regular checkcord, which will attach to the collar; a length of softer rope similar in diameter and approximately 25 feet long with a brass bolt snap at one end, a larger loop tied on the other, and a non-slip knot (a steel T-post works well) pounded in securely. Plan on setting up at least three posts.
The place where you will work needs to give you room to use the entire area around the post, so plan on about a 60-foot diameter. Take your soft rope and drop the large loop over the post. Lay the balance out straight, with the snap at the end farthest from the post.
Using the checkcord, quarter the dog until it is loose and happy. This is an important step that needs to be repeated before every post, every time.
Quarter your dog past the snap on the whoa-post on the ground. You stop at that snap (the dog will be out beyond the snap) and utilize this as an opportunity to cue the dog to come to you. When you do this, cue the dog with a tug-release-tug-release (momentary stimulation) on the checkcord. Bring the dog straight back to you and stop it so that it’s in the proper position to attach the whoa-post rope: parallel to the rope and a few feet back from the snap, facing outward and away from the post. Make sure to leave plenty of slack to work with.
Keeping your dog positioned, reach down with one hand and pick up the whoa-post rope (make certain not to let go of your dog or allow him to break out with a bad case of happy feet). Place the snap end of the whoa rope on the ground between the dog’s hind legs, then bring it toward you and over the top of the dog’s back and down the side away from you. Bring the snap end under the belly and behind the rope draped over the back. You will have a loop going around the flank area, but never a knot. Correctly done, this forms a half-hitch. This is important since the half-hitch will release quickly, while a knot will tighten and defeat the purposes. Pull the snap end up between the dog’s front legs, keeping it under the chest, and snap it to the same D-ring your checkcord is hooked to. Using the same D-ring will take the action of the checkcord from the neck to the flank as the dog applies pressure. As you work the dog on the post, be sure the rope stays between the hind legs. If you need to replace it, do so, since proper placement is critical in helping the dog understand the stimulation.
Then, facing your dog, walk back 10 or 15 feet toward the end of the checkcord (away from the post), keeping slight tension. When you stop moving, apply a firm, steady pull to the checkcord. Keep the tension in the rope taut, no matter what. Some dogs will stand there and look at you, others will immediately start to fight it. Be ready, and keep continuous tension on the checkcord so the dog cannot escape it.
There will be resistance; count on it and be ready. Your job at this first stage is to work through the resistance, and you do that by applying steady pressure on the checkcord and leaning into it if your dog doesn't’t resist. Never, ever jerk on the checkcord. It is always steady, even pressure, applied at varying levels to get the resistance reaction we want. And remember, it’s the pinch the dog feels from the stimulation at the end of the rope that is the goal, not just getting the dog to stand still when it gets to the end of the rope. The dog must learn to stop on stimulation rather than because it ran out of rope. Since we’re not naming the command at this point, it’s important that the point of contact on the flank be cued anytime the dog moves until you release him from the ropes.
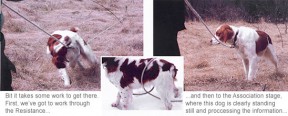
There are three distinct stages your dog will go through: Resistance, Association, and Conditioned Response.
RESISTANCE
The resistance is simply the learning process enabling the dog to become comfortable with the rope around the flank. For a dog to become comfortable with and understand the concept of the flank rope, it first has to test the boundaries, thus you have the resistance. Remember how your puppy went through the same process of resistance the first time you put a collar around its neck and was led? Only after your pup learned the boundaries of the restraint were you able to teach him to lead by giving cues on the neck.
Dogs will resist the feel of the rope around their flank and fight it, some harder than others, but they all need to be pushed to resistance. The most important aspect of this stage is that you stimulate enough to push the dog to resist. The dogs that resist the most at this stage also learn the fastest.
What does resistance look like? The dog that is really resisting will pitch a major fit. You’ll see them bite at the flank rope and the checkcord, fall over and roll on the ground, try to spin sideways, play dead, and generally object to the whole process. It’s not pretty, but the main thing is to stay calm, work through it, and not panic. The dogs that are supposed to be the softest are the ones most likely to fight the hardest – they are not as soft as you think.
Dogs tend to learn things in sets of threes and sevens, so expect them to try each resistance at least three times before they figure out that it won’t work. The resistance stage should not last for more than three days of whoa post work. Make sure you push your dog to resistance – don’t let it get away with just stopping and standing at the end of the rope. If the dog does not resist, it cannot learn to turn off the stimulation. During this step and all the following, the dog must stay straight toward you and not be allowed to turn around or circle. If the dog just lies down and refuses, keep the tension in the checkcord and walk to about a 45-degree angle to one side and stimulate again. This will bring the dog back to its feet.
When do you stop the stimulation? Watch your dog and read it carefully: When the dogs stops fighting and is standing still, release the tension in the checkcord, stopping the stimulation. The release has to happen quickly. At that point, we’re waiting for one of several signs that the dog has given in. The dog may swallow, lick its lips, give a big sigh, yawn, or reposition its feet to a more comfortable, square stance. At this point, walk up wrapping your checkcord hand over hand, and keeping slight tension so you can immediately stimulate should the dog move. If the dog stays till, rub it over the top of the back and shoulders to release the tension in the body, and then undo the flank rope. Always give a release cue to tell the dog it is free to move. We use a light touch on the head and either a short whistle or a verbal, “All right.” Checkcord the dog until it’s loose and relaxed before going to the next post. At this stage, do one stop per post, always loosening the dog up in between.
ASSOCIATION
The Second Stage comes when you pull a dog to the end of the rope and stimulate, and you can see he’s really thinking about it. The dog will anticipate the stimulation and the resistance will be gone. At this point, you know you’re in the second stage. The dog will turn its head away and keep its eyes soft and passive while it processes the information. However, if the dog’s eyes are wandering and looking around, you’ll need to apply stimulation again. When the dog is processing, let the rope fall slack; at some point , the dog will acknowledge you by looking at you and swallowing. Be aware and read your dog so you don’t miss these little details.
While our goal is immobility, if your dog has stopped in an awkward position and moves a foot or two to stand comfortably, this is acceptable 0 don’t stimulate for that movement. However, if the dog moves its head toward the ground, stimulate. This is very important because there will be a time later on when the dog is on a bird that runs (usually bad pen-raised birds) and it’s lower its head and start sniffing. Eliminate that movement now. That way the dog will learn to keep its head up when it stops.
CONDITIONED RESPONSE
You'll know you’ve reached this step when you put the dog on the post and it’ll just stand still, not wanting to move forward. It will understand that stimulation is coming and will want to turn it off before it happens. When you get to this stage, it’s very important to always pull the dog to the end of the rope. Don’t allow the standing still until you have cued for it, and always make the dog go to where you want toe whoa to happen.
When you’ve arrived at this stage, it’s time to introduce distractions. Use your imagination here. You can walk laterally or back and forth in front of the dog; you can walk to the dog, pet it, and walk away; toss a Frisbee or your hat or glove; have the kids or another dog run past – use most anything that will tempt the dog to move. Anything, that is, except birds. Using birds can be a wreck, because if the dog jumps forward and hits the end of the rope, it will over stimulate itself and bounce backward. If the dog learns this on the post, it will carry over to the field and on birds. Remember to keep the checkcord in your hand at all times, with just enough slack that you aren’t re-cueing the dog to whoa, but not so much slack that your timing will be off should you need to make a correction.
When the dog has the conditioned response and can handle distractions, it’s time to add a 180 on the post. Generally, it takes about 30 workouts of three posts each, spread over a couple of weeks, before the dog gets to this stage. This is the very last stage, so be sure to wait until the dog is really ready for it rather than testing to see if the dog can do it. Go to your stopped dog, stand at its side, and prepare to heel it in the opposite direction. Give the release cue and heel the dog across to the other side. By doing this you’ll get to the end of the rope at the same time, and the dog won’t get jerked. Note how much slack you’ve got. The second you reach the end of the rope apply a little simulation at the same time the flank rope does. You will continue to walk by and let the momentum of your body continue to stimulate the dog as you walk past it and out to the end of the checkcord.
There are three stages to the 180 portion. At first, the dog is tight and doesn’t want to move at all. Second, the dog is tight, then loose past the post, then tight again near the end of the rope. At the third stage, the dog is tight all the way across. When you get to this stage, there’s nothing left to do on the post, and it’s time to make the transition from the mechanical cue of the whoa post to the remote cue – the e-collar.